For this functionality, you need at least a Professional license. Additionally, you require certain user rights. If you do not have the appropriate rights, ask the administrator in your organization for access.
With Incontrol, you can import your Excel data into an Incontrol form in two ways. For instance, you can synchronize an online file from OneDrive. You can read more about this in this article.
Table of contents
-
Formatting an Excel File
-
Add a connector
- select from which column you want to import the data
- Importing data into Dynamic Content
Formatting an Excel File
To import data from an Excel file, the Excel must be structured in the right way. With Incontrol, you can import rules within an Excel sheet/table. Furthermore, you can link different sheets together, allowing you to import data into dynamic content. In this article, we use an example Excel with 3 sheets:
- Municipalities
- Employees
- Equipment
We aim to import a municipality with all its employees and the equipment they have at their disposal.
In the sheets, we have created tables with the correct data. The tables are as follows:
Municipalities

Employees

Equipment

The table always starts in cell A1. If you want to be able to import data within a dynamic content, it is important that you can link tables together via a common field. In this example, we want to be able to fetch the corresponding employees based on the selected municipality. And from these employees, we subsequently want to import the correct equipment. Therefore, in the table of Employees, you also see the municipality listed, and in the table of Equipment, the name of the employee.
Note: These tables are thus divided over 3 tabs in Excel.
Add a connector
To be able to use your Excel file, you first need a connector within your organization. Fortunately, you can easily create one yourself within our web portal.
- Go to 'Organization' on the left side of the menu
- Go to 'Connectors'
- Click on the plus button at the bottom right of the screen

4. A pop-up will open
5. Search for the 'Microsoft Excel' Connector and select it


8. Click on 'Add'
9. Upload a new Excel file by clicking on 'No file chosen' and select your file
10. You will now see the following overview:

12. If you want the Excel data to be available even if the app user does not have an Internet connection, you can check the "Make available offline" checkbox. The app (currently only iOS) will then save the complete content locally, so it can be searched regardless of an active connection. Watch the video and article "Being able to use an Excel file offline".
13. If you share drafts with third parties, you can specify whether they also get access to import data from this connector. Third parties are all individuals who do not have an account in your organization in Incontrol.
Select from which column you want to import the data.
- Select the correct tab
In our example, we use the Municipalities tab. - Select a column under ‘Excel column’
These are the headers from your Excel table.
You always import one row of data at a time from the table. - Fill in ‘List title’
This determines what users can search for.
The title will also appear in the search results (max. 256 characters). - Check additional columns under ‘List description’
This information will be included as a description in the search results.
a. Titles are displayed in bold
b. Descriptions are shown on a separate line per column
c. There is room for a maximum of 4 lines in the app. - Check that you’re using the correct alias under ‘Import alias’
a. The alias is equal to your column name by default.
b. Spaces are automatically replaced with an underscore ( _ )
c. Don’t want to import a column? Just enter a single underscore ( _ ) - Click the disk icon in the top right to save
a. On Windows: Ctrl + S
b. On Mac: Cmd + S
Importing data into Dynamic Content
- It is now also possible to import data from your Excel file into dynamic content.
This is only possible by uploading your Excel file to Incontrol, not by using the online version of Excel.
Below, we explain how to configure the connector. - Add a linked sheet by pressing the '+ Linked sheet' button
-
You’ll then see the following overview:

Step 1: Ensure matching values
Make sure both tables contain a column with the same type of information.
For example:
-
In the primary sheet (Municipalities): column Municipality
-
In the linked sheet (Employees): column Municipality
Step 2: Set up the link
Select the primary column
Under Primary sheet column, select the column that will be used to load multiple rows into dynamic content.
→ In this example: Municipalities tab, column Municipality
Select the linked column
Under Linked sheet column, select the column from the second sheet that contains the matching value.
→ In this example: Employees tab, column Municipality
Understand the relationship
One row in the Municipalities sheet may result in multiple rows in the Employees sheet — if the Municipality values match.
Step 3: Define an alias
Assign an alias (nickname) to the link.
For example: employees
You’ll use this alias in your form to indicate where the linked data should appear in the dynamic content.
You can also define additional aliases for columns in the linked sheet, so you can easily reference those columns in the form.
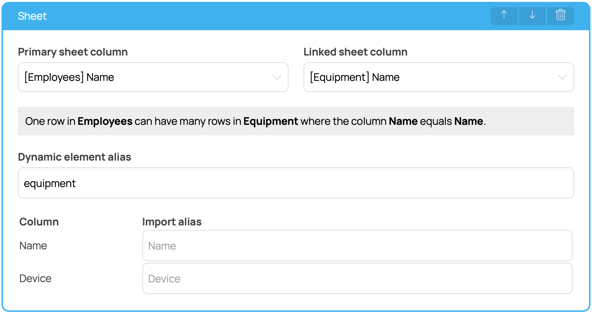
Example of an additional linked sheet
In our example, we’ll add another linked sheet.
This sheet contains a list of employees per municipality and looks as follows: